Tutorial
Managing Images with PicGo and Oracle Object Storage
This article is part of the author's setup for an automated writing workflow. At present, I mainly use Markdown in Obsidian to write blog posts and notes, and images are often needed to enrich the information. Because Obsidian's local image management is not convenient enough, an automated workflow is needed to handle images in notes and blog posts.
On this page
Prerequisites
- You already have an Oracle Cloud account, have created a storage bucket (with public visibility), and have recorded the bucket name and namespace
- You have downloaded and installed PicGo, and enabled the S3 image upload plugin and the squoosh image compression plugin
- You already have a Cloudflare account
Configuration Method
1. Generate an Oracle Object Storage customer secret key
After logging in to Oracle Cloud, click your avatar in the upper-right corner, go to 用户设置-资源-客户密钥-生成密钥, and create a new Secret Access Key and Access Key ID:
# 存储桶名称
bucket

# 生成密钥 Secret Access Key:
oe...Mc

# 访问密钥 Access Key ID:
c1...73
The Oracle Object Storage server address is:
名称空间.compat.objectstorage.主区域代码.oraclecloud.com

# 示例
abcdefg.compat.objectstorage.ap-tokyo-1.oraclecloud.com
For the complete API endpoints, see the official documentation: Amazon S3 Compatibility API
In addition, for better security and to avoid the risks caused by DNS pollution in some regions, Oracle officially recommends using OCI Object Storage Dedicated Endpoints. Interested readers can configure them accordingly.
2. Understand the S3 plugin setting fields and their meanings
According to the official introduction, the plugin settings are explained and exemplified as follows:
| Key | Description | Example |
|---|---|---|
accessKeyID | AWS credential ID | |
secretAccessKey | AWS credential secret | |
bucketName | S3 bucket name | gallery |
uploadPath | Upload path | {year}/{month}/{fullName} |
urlPrefix | Custom prefix for the final generated image URL | https://img.example.com/my-blog/ |
endpoint | Specify a custom endpoint | s3.us-west-2.amazonaws.com |
proxy | Proxy address | Supports HTTP proxy, for example http://127.0.0.1:1080 |
region | Specify the region used to execute service requests | us-west-1 |
pathStyleAccess | Whether to enable S3 path style | Defaults to false; set to true when using minio (e.g., https://s3.amazonaws.com/bucketName/key instead of https://bucketName.s3.amazonaws.com/key) |
rejectUnauthorized | Whether to reject invalid TLS certificate connections | Defaults to true; if the upload failure log shows certificate issues, it can be set to false |
acl | Access control list, the access policy for uploaded resources | Defaults to public-read; AWS options include `private" |
disableBucketPrefixToURL | When pathStyleAccess is enabled, whether to disable adding the bucket prefix to the final generated URL | Defaults to false |
The payloads supported by upload path and their descriptions are as follows. You can configure the upload path in the storage bucket as needed:
| payload | Description |
|---|---|
{year} | Current date - year |
{month} | Current date - month |
{day} | Current date - day |
{fullName} | Full filename (including extension) |
{fileName} | Filename (without extension) |
{extName} | Extension (without .) |
{md5} | Image MD5 calculated value |
{sha1} | Image SHA1 calculated value |
{sha256} | Image SHA256 calculated value |
3. Configure the S3 image hosting
A software configuration example is shown below:
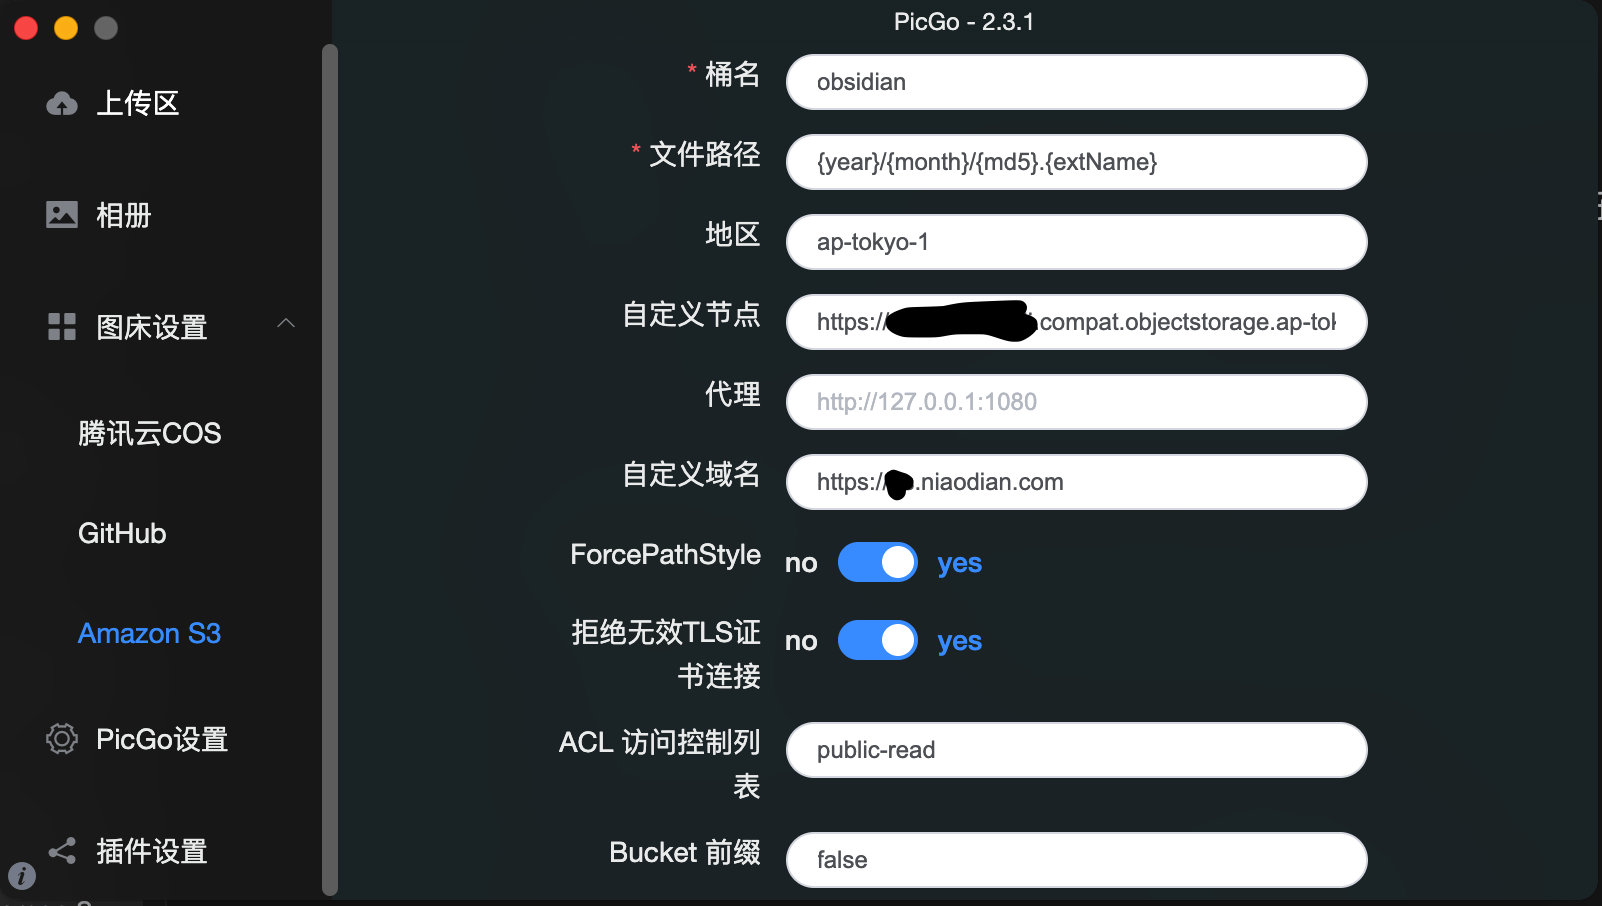
Note: Previously, ForcePathStyle had to be set to True; otherwise, when uploading, the custom endpoint would automatically have the bucket name prefixed to the endpoint you entered, causing the upload to fail. The problem this introduced was that when using a custom domain, the link to the uploaded file would also automatically include the bucket name after the custom domain, which could easily prevent images from displaying properly in Obsidian under the custom domain.
Also pay attention to the Bucket前缀 option in the settings. Here we use the default value False, which causes uploaded images to appear as <自定义URL>/<存储桶名>/<文件名>. The Worker configuration logic later in this article is also based on this.
In theory, when the Bucket前缀 option is True, uploaded images will appear as <自定义URL>/<文件名>, which is more concise. Readers can try it themselves and adjust the Worker configuration logic accordingly.
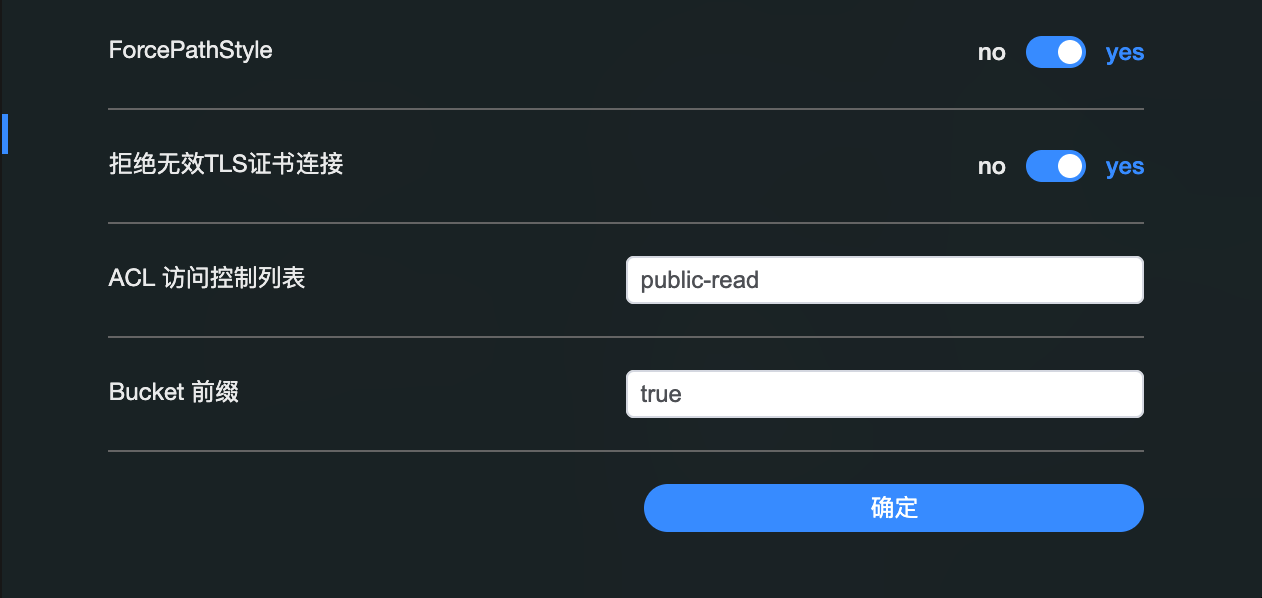 Open larger image: image.png
4. Proxy a custom domain through a Cloudflare Worker
In fact, once step 3, the S3 image-hosting configuration, is complete, the workflow for PicGo to automatically upload images to Oracle Object Storage already works normally. If you are only keeping private notes, this is already enough.
However, considering that some of the content I write in Obsidian will be published to my blog, using a custom domain is quite important. In my testing, pointing a CNAME subdomain to the Object Storage bucket URL did not work smoothly, so a Cloudflare Worker is needed for automatic reverse proxying.
First, prepare the Worker configuration code:
/**
 * Welcome to Cloudflare Workers! This is your first worker.
 *
 * - Run "npm run dev" in your terminal to start a development server
 * - Open a browser tab at http://localhost:8787/ to see your worker in action
 * - Run "npm run deploy" to publish your worker
 *
 * Learn more at https://developers.cloudflare.com/workers/
 */


// Website you intended to retrieve for users.
// 请填写您的实际存储服务地址
const upstream = 'abcdefg.compat.objectstorage.ap-tokyo-1.oraclecloud.com'

// Custom pathname for the upstream website.
// 如果ForcePathStyle为False,或者为True且同时Buket前缀为True时,则在此处填入存储桶名称
const upstream_path = ''

// Website you intended to retrieve for users using mobile devices.
// 请填写您的实际存储服务地址
const upstream_mobile = 'abcdefg.compat.objectstorage.ap-tokyo-1.oraclecloud.com'

// Countries and regions where you wish to suspend your service.
const blocked_region = ['']

// IP addresses which you wish to block from using your service.
const blocked_ip_address = ['0.0.0.0', '127.0.0.1']

// Whether to use HTTPS protocol for upstream address.
const https = true

// Whether to disable cache.
const disable_cache = true

// Replace texts.
const replace_dict = {
    '$upstream': '$custom_domain'
}

addEventListener('fetch', event => {
    event.respondWith(fetchAndApply(event.request));
})

async function fetchAndApply(request) {

    const region = request.headers.get('cf-ipcountry').toUpperCase();
    const ip_address = request.headers.get('cf-connecting-ip');
    const user_agent = request.headers.get('user-agent');

    let response = null;
    let url = new URL(request.url);
    let url_hostname = url.hostname;

    if (https == true) {
        url.protocol = 'https:';
    } else {
        url.protocol = 'http:';
    }

    if (await device_status(user_agent)) {
        var upstream_domain = upstream;
    } else {
        var upstream_domain = upstream_mobile;
    }

    url.host = upstream_domain;
    if (url.pathname == '/') {
        url.pathname = upstream_path;
    } else {
        url.pathname = upstream_path + url.pathname;
    }

    if (blocked_region.includes(region)) {
        response = new Response('Access denied: WorkersProxy is not available in your region yet.', {
            status: 403
        });
    } else if (blocked_ip_address.includes(ip_address)) {
        response = new Response('Access denied: Your IP address is blocked by WorkersProxy.', {
            status: 403
        });
    } else {
        let method = request.method;
        let request_headers = request.headers;
        let new_request_headers = new Headers(request_headers);

        new_request_headers.set('Host', upstream_domain);
        new_request_headers.set('Referer', url.protocol + '//' + url_hostname);

        let original_response = await fetch(url.href, {
            method: method,
            headers: new_request_headers
        })

        let original_response_clone = original_response.clone();
        let original_text = null;
        let response_headers = original_response.headers;
        let new_response_headers = new Headers(response_headers);
        let status = original_response.status;

		if (disable_cache) {
			new_response_headers.set('Cache-Control', 'no-store');
	    }

        new_response_headers.set('access-control-allow-origin', '*');
        new_response_headers.set('access-control-allow-credentials', true);
        new_response_headers.delete('content-security-policy');
        new_response_headers.delete('content-security-policy-report-only');
        new_response_headers.delete('clear-site-data');

        if(new_response_headers.get("x-pjax-url")) {
            new_response_headers.set("x-pjax-url", response_headers.get("x-pjax-url").replace("//" + upstream_domain, "//" + url_hostname));
        }

        const content_type = new_response_headers.get('content-type');
        if (content_type != null && content_type.includes('text/html') && content_type.includes('UTF-8')) {
            original_text = await replace_response_text(original_response_clone, upstream_domain, url_hostname);
        } else {
            original_text = original_response_clone.body
        }

        response = new Response(original_text, {
            status,
            headers: new_response_headers
        })
    }
    return response;
}

async function replace_response_text(response, upstream_domain, host_name) {
    let text = await response.text()

    var i, j;
    for (i in replace_dict) {
        j = replace_dict[i]
        if (i == '$upstream') {
            i = upstream_domain
        } else if (i == '$custom_domain') {
            i = host_name
        }

        if (j == '$upstream') {
            j = upstream_domain
        } else if (j == '$custom_domain') {
            j = host_name
        }

        let re = new RegExp(i, 'g')
        text = text.replace(re, j);
    }
    return text;
}


async function device_status(user_agent_info) {
    var agents = ["Android", "iPhone", "SymbianOS", "Windows Phone", "iPad", "iPod"];
    var flag = true;
    for (var v = 0; v < agents.length; v++) {
        if (user_agent_info.indexOf(agents[v]) > 0) {
            flag = false;
            break;
        }
    }
    return flag;
}
Then configure it manually:
Go to Cloudflare Workers, set a subdomain for Workers, and create a new Worker.
Copy the code above into the online editor.
Save the code and deploy it, then test that the reverse proxy works properly.
5. Bind a custom domain
Add the domain to Cloudflare.
Open the domain’s control panel, select
Workers路由, and click添加路由.In
路由, enterhttps://<自定义域名>/<对象存储桶名>/*and select the Worker you just created (note that if theBucket前缀option above was set to True, this should behttps://<自定义域名>/*).Add a CNAME DNS record for the custom domain. On the DNS page, enter the custom domain’s subdomain (or @) in the
名称field, enter the Worker’s third-level domain (for example, os.test.workers.dev) in the目标field, and turn on proxy status.
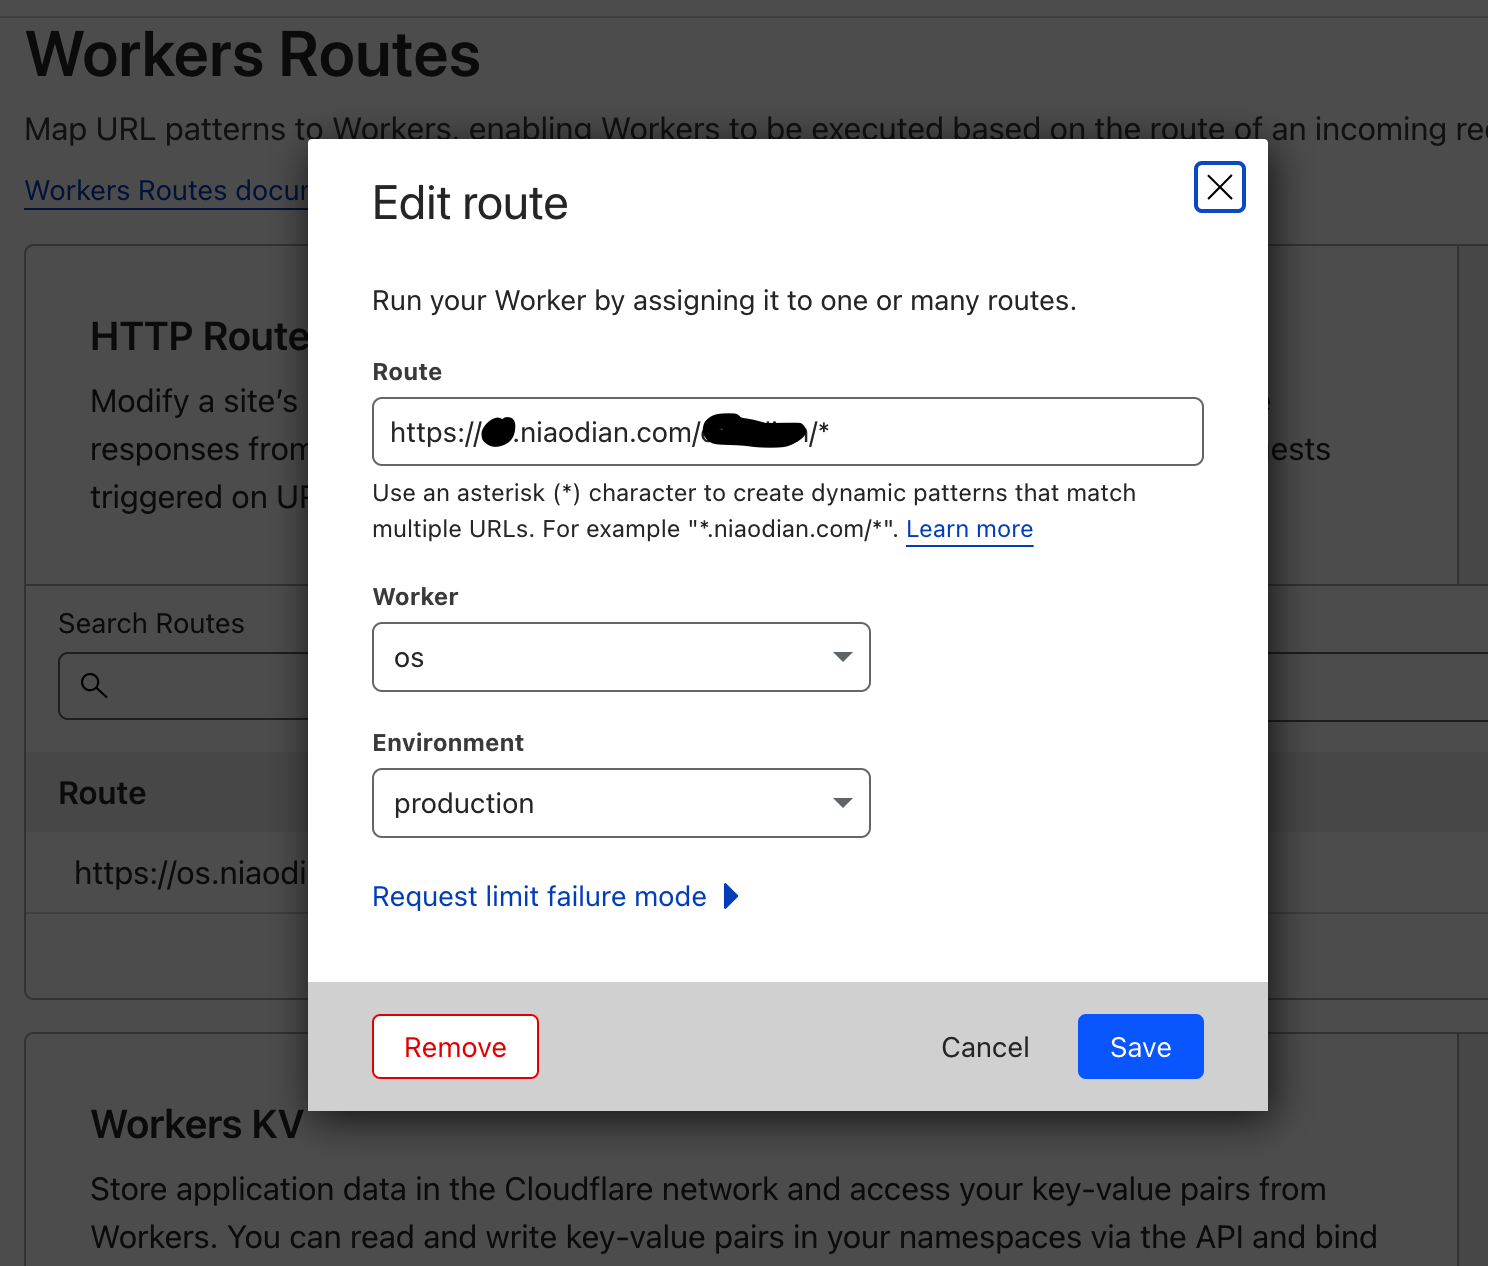 Open larger image: image.png
6. Direct image links are opened by Chrome as XML text
According to an article by Hanye Ark, the cause is that Oracle Object Storage does not provide the file’s “content-type” in the Response Header. Cloudflare’s No-Sniff Header feature prevents Chrome from determining the file type on its own, causing Chrome to open the image file as XML text.
Solution:
Go to the SSL/TLS settings for the corresponding domain in Cloudflare.
Click Edge Certificates.
Enable HTTP Strict Transport Security (HSTS), then select Change HSTS Settings.
Set No-Sniff Header to Off.
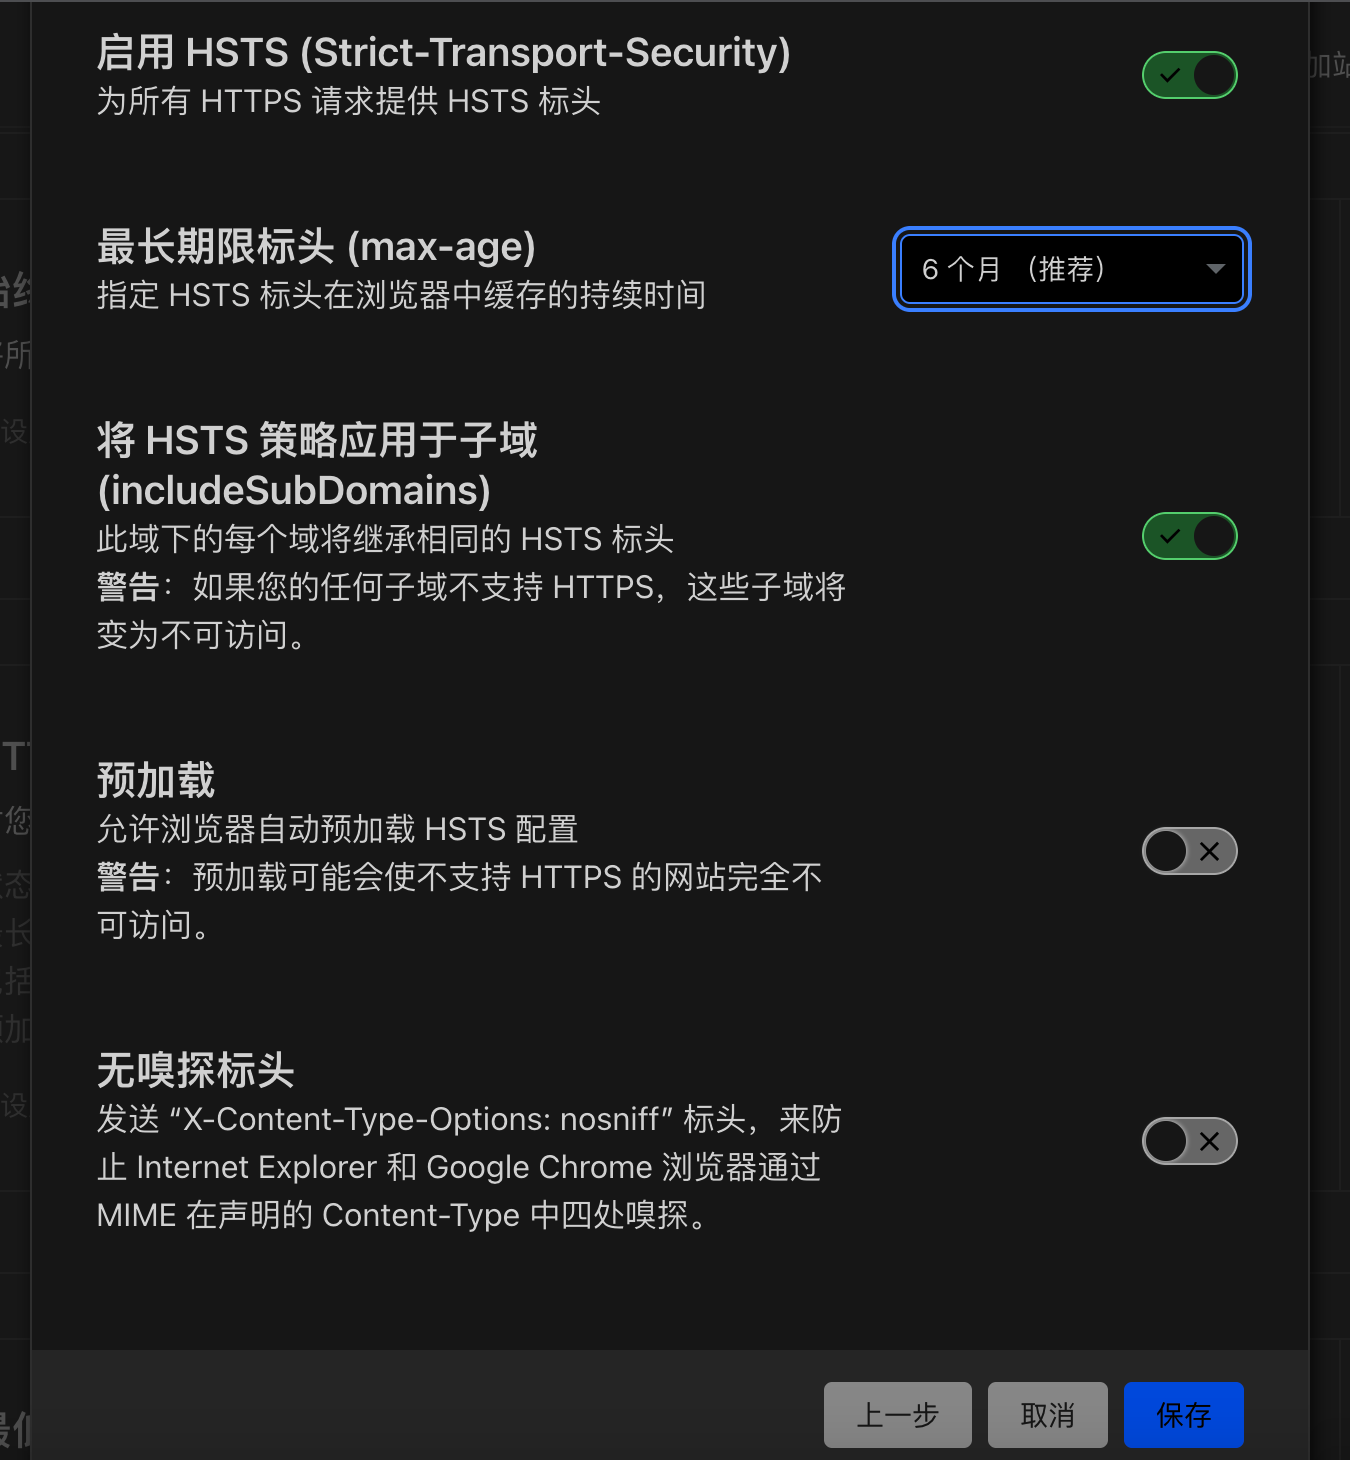 Open larger image: image.png
Summary
The images displayed in this article benefit from the automated workflow in which PicGo uploads images to Oracle Object Storage. After taking a screenshot on the computer, I can paste it directly into Obsidian; PicGo completes image compression, uploads the image to the storage bucket, and embeds it directly into the article in Markdown syntax. Of course, because this article was written relatively early, ForcePathStyle was set to True, and the Bucket前缀 option was also left at the default False. As a result, I encountered a bug in PicGo (or possibly in the S3 plugin): after uploading images multiple times, the upload link would repeatedly nest the bucket name into the image URL (such as https://<URL>/bucket/bucket/xxx.png), so the image URL still had to be manually corrected each time. Readers can try setting the Bucket前缀 option to the default True when configuring it; I believe that would be more complete and could avoid the software or plugin bug.